

Martin Wheeler has worked for Britain’s Autoglym for 40 of its 60 years. As a technical services specialist, his role is primarily in training detailers how to correctly use the company’s cleaning products. Those detailers include assorted royal chauffeurs, as the company’s Royal Warrant means it’s an official supplier to the palace.
Autoglym produced 13 million liters of car-cleaning products at its factory in 2024, and it exports them to 40 countries around the world, including the U.S.—although not all of the more than 100 different potions are available.
I spent a day with Wheeler on a new Car Enthusiast Experience Day offered at the company’s Hertfordshire headquarters and picked up these handy hints.
At the very least, you’ll need a couple of buckets, some sponges, and some drying cloths. Soft brushes with shredded bristles—no metal or square-cut bristles, which could harm your paintwork—are also useful.
You may like the convenience of wash mitt, but Wheeler reckons a sponge is just as effective, and, even more importantly, if you drop it on the ground you’ll be more inclined to throw it away than a pricier mitt, which avoids the risk of transferring grit to your paintwork. As for on-trend lambswool mitts, “Have you ever seen a sheep’s bottom? Don’t tell me dirt doesn’t stick to wool,” he says.
If you want to add some power, then a jet washer is a great tool to have, but you might want to take a moment before you click on that Instagram ad for an electric dryer. “We use pet dryers. They’re exactly the same and half the price,” says Wheeler.
For a hand finish, microfiber towels can be a good alternative to a real or synthetic chamois, but you can’t wring them out in the same way, so you may need several. A glass cloth is also a good investment, as it won’t leave fibers behind when cleaning a touch screen or windows.
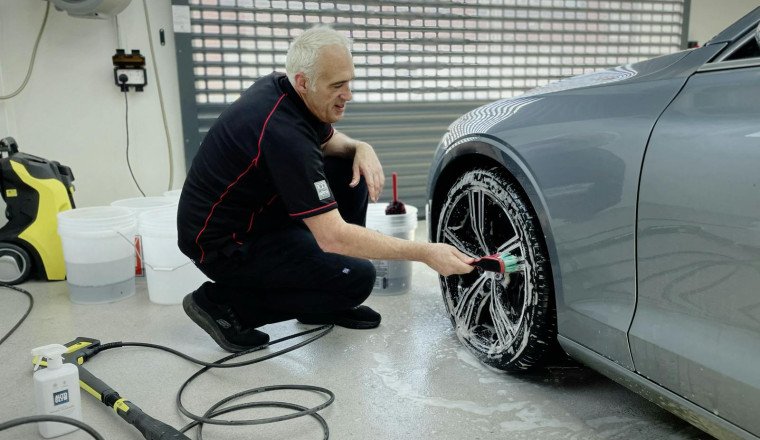
On the subject of glass, Wheeler reckons, “Windows and wheels are the two most important areas. If you don’t clean them properly, then you’re wasting your time with the rest of the car.”
Brake dust is the enemy. “You need to keep on top of it to keep your wheels in good condition,” says Wheeler. If your wheels are protected by a lacquer, then you can use a dedicated wheel-cleaning product, but some, Wheeler warns, can be corrosive. To prove the point he demonstrates by dropping two pieces of aluminum foil into two test tubes. One contains a rival’s product and the other Autoglym’s Custom Wheel Cleaner. After just a few minutes the foil in the rival product is visibly pitted in the fizzing liquid, while the one in the Autoglym juice is untouched.
Wheeler says to always tackle one wheel at a time to avoid prolonged exposure to the chemicals, whatever product you are using. Spray liberally from the bottom up and then use a soft brush to get into the spokes and detailed areas. Rinse off and then roll the car back a little and repeat to make sure you don’t miss any bits.
Avoid bright sunshine if you can, as it will dry up the cleaning products before you’re ready and cause streaks. Early morning or late afternoon are generally the best times if you have to be outside; if you have a covered bay with drainage, that’s ideal.
Snow foam offers a pretty low-effort start to the cleaning process. You spray it on and just wait for the dirt to run off. Autoglym recommends a two-stage foam process. Part one is to apply its Polar Blast liberally, spraying from the bottom up and treating the car’s vertical surfaces first, followed by its horizontals. An attachment for a jet washer makes this easy, but you can also use a pressurized hand sprayer.
On the horizontal parts, spray the area furthest from you and work in. “Leave the foam to work for as long as you can,” says Wheeler.
Rinse off the Polar Blast and then repeat the process with Polar Wash, which is designed to be agitated and get rid of the dirt loosened by the Blast. Employ a sponge or mitt, using horizontal sweeps and starting with the top surfaces and working downward. Don’t forget “underappreciated areas,” such as around the fuel filler, wheel arches, and the door shuts. “They’re like the hallway to your home, the first thing someone notices when they get in.” Rinse off the foam, and you’re ready for the next stage.
If you prefer to be really hands-on, then you can use a more traditional shampoo. Fill two buckets with water and add the correct amount of shampoo to one of them. Stir it vigorously and then mark that bucket so you don’t get mixed up. Apply the shampoo with a mitt or sponge, starting at the top and washing down. Rinse your sponge or mitt regularly in the second bucket and use up all of the shampoo before rinsing off.
You might think your car is clean, but the chances are that it really isn’t. Airborne contaminants stick to paintwork and leave it feeling slightly rough to the touch. In the trade they call this “fallout,” and it comprises dust and metal particles that stick to the surface of your paint and seriously compromise its shine. “The way you get a car as shiny as possible is to make it as smooth as possible,” explains Wheeler.
He recommends that the first stage of cleaning up this fallout is to use Autoglym’s Magma spray. This color-changing liquid rapidly oxidizes the stuck-on metal particles but is pH neutral to avoid damaging the paint. Spray it on and the fallout is revealed before it dissolves.
After washing it off you can use a clay bar to remove any remnants. The key to using clay properly is to make sure that you spray the bar and the car liberally with detailing liquid so that it glides smoothly over the surface, using very light pressure. Always move the bar in a straight line, and when it has picked up particles, fold it over to use a fresh section. “If you happen to drop it on the ground, throw it away,” warns Wheeler.
A great way to do a before-and-after test is to pop a cellophane bag over your fingers to run it over the bodywork; it somehow amplifies every imperfection.
If you have tar spots on the car, then use a dedicated product such as Autoglym’s Intensive Tar Remover to dissolve it, rather than scraping it off.
With your bodywork now finally clean, rinsed, and dried off (using your choice of cloth, chamois, or power tool) then it’s time to add some protection.
Autoglym offers a number of solutions, from an easy-to-apply Polar Seal, which provides a hydrophobic coating and is sprayed on like its snow foams, to waxes and ceramic coatings. Wheeler is a fan of wax. “It’s a sacrificial coating,” he explains. “It washes off and takes the contaminants with it.” Ceramic coatings, meanwhile, are harder and prevent the contaminants from bonding to the paint surface.
When applying any of these, start with the hood, roof, and trunk first, and apply in a circular motion with a suitable cloth or sponge, avoiding unpainted plastics. Wax can be left unpolished for months at a time, so if you are storing your car over winter, it could be a good option. Ceramic coatings and Autoglym’s Super Resin Polish need to be buffed up right away. For a final finish, you can use a small amount of Bumper & Trim Gel or equivalent, to shine up the exposed plastic.
For the glossiest glass, drop your windows by an inch or so to clean off the shut marks with a dedicated cleaning spray, like Autoglym’s Fast Glass. “Only use a very light mist of spray. If it’s running down the window, you’ve used too much,” says Wheeler. For absolute clarity you can also use a glass polish. For this you can be much more generous with your application before buffing it up to a shine.
Moving to your car’s interior, start with a thorough vacuuming. Use a brush or an air line to shift any harder-to-reach dirt. To clean interior trim, use a synthetic chamois and a spray such as Autoglym’s Interior Cleaner and Sanitiser or All Purpose Cleaner, rinsing and squeezing the chamois to get rid of any crud as you go from area to area.
Modern car seats can be full of electronics, so it’s best not to be too heavy-handed with any liquids. “Shiny leather is dirty leather,” says Wheeler, and a light spray and wipe should clean it up nicely, while older material can also be treated with a balm and buffed.
Wheeler reckons that going through this whole process will take around three hours of elbow grease, although following washes it should be quicker, as the protective products last a few months. If you think that’s a long time then consider that he once spent an entire week detailing an Aston Martin for a concours customer…


Facebook Conversations